> ## Documentation Index
> Fetch the complete documentation index at: https://docs.ironbee.ai/llms.txt
> Use this file to discover all available pages before exploring further.
# Getting Started
> Sign up, install the IronBee CLI, and set it up in your first project.
The IronBee CLI connects your AI coding agent to IronBee. Once installed in a project, it wires up the hooks and tools your agent needs so that every code change gets verified before a task is marked complete.
This guide covers the basics: create an account, install the CLI, sign in, and set up your first project. That's all you need to get going; deeper configuration comes later.
## Prerequisites
* **Node.js 22 or later** - check with `node --version`
* An AI coding client: [Claude Code](https://docs.anthropic.com/en/docs/claude-code), [Cursor](https://cursor.com), or [Codex CLI](https://github.com/openai/codex)
***
## Overview
Sign up at [console.ironbee.ai](https://console.ironbee.ai).
`npm install -g @ironbee-ai/cli` installs the `ironbee` command globally.
`ironbee login` connects the CLI to your account. One time per machine.
`cd` into your project and run `ironbee install` to wire up your AI client.
***
## Step 1 - Create your account
Go to [console.ironbee.ai](https://console.ironbee.ai) and sign up. If you already have an account, just sign in.
Your account gives you access to the dashboard and is what the CLI connects to in the next steps.
***
## Step 2 - Install the CLI
Install the CLI globally with npm:
```bash theme={null}
npm install -g @ironbee-ai/cli
```
Verify the installation:
```bash theme={null}
ironbee --version
```
***
## Step 3 - Sign in
From any directory, run:
```bash theme={null}
ironbee login
```
This opens [console.ironbee.ai](https://console.ironbee.ai) in your browser. Authorize the CLI, and it stores a personal OAuth access token locally. You only need to do this once per machine.
When it completes, the terminal prints a confirmation:
```
✓ Logged in successfully!
Console https://console.ironbee.ai
Collector https://collector.service.ironbee.ai
Token personal (my-laptop)
Config ~/.ironbee/config.json
```
If the browser doesn't open automatically, the CLI prints a URL you can paste in manually. Running in CI with no browser? Use an account API key instead, see [Authentication](/cli/guides/authentication).
***
## Step 4 - Set up your project
Navigate to the project you want to use IronBee with, then run the installer:
```bash theme={null}
cd your-project
ironbee install
```
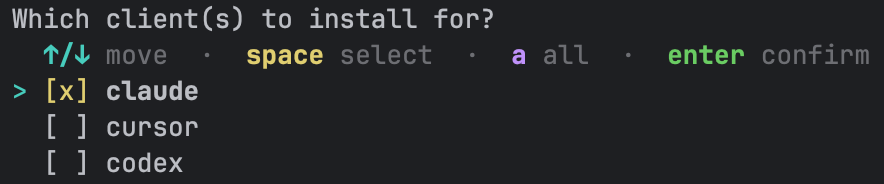
IronBee detects your AI client (Claude Code, Cursor, or Codex) and sets it up automatically. If it can't detect one, it asks which client(s) to install for — a checkbox multi-select where **space** toggles a client, **`a`** selects all, and **Enter** confirms (so you can set up several at once).
 Then it walks you through two quick arrow-key pickers. First, **which verification mode** to run:
* **`assist`** *(default)* the verifier and `/ironbee-verify` are installed so the agent can verify on demand, but nothing blocks task completion.
* **`enforce`** changes must pass every active cycle before a task can complete.
* **`monitor`** analytics only; no verification machinery is installed.
Then it walks you through two quick arrow-key pickers. First, **which verification mode** to run:
* **`assist`** *(default)* the verifier and `/ironbee-verify` are installed so the agent can verify on demand, but nothing blocks task completion.
* **`enforce`** changes must pass every active cycle before a task can complete.
* **`monitor`** analytics only; no verification machinery is installed.
 Then, unless you chose `monitor`, **which platforms to verify**:
* **Browser** on by default covers most frontend work.
* **Node**, **Backend**, **Android**, and **Terminal** opt-in; enable any you want gated.
* Not sure which to pick? Press **`s`** to let IronBee analyze your project and suggest the set (Claude Code / Codex only).
Then, unless you chose `monitor`, **which platforms to verify**:
* **Browser** on by default covers most frontend work.
* **Node**, **Backend**, **Android**, and **Terminal** opt-in; enable any you want gated.
* Not sure which to pick? Press **`s`** to let IronBee analyze your project and suggest the set (Claude Code / Codex only).

 You can change both anytime later (see [Verification](/cli/guides/verification)).
That's it. Your project is now connected to IronBee.
Restart your AI coding client after installing so it picks up the new setup.
***
## What's next?
Give your agent a task as you normally would. When it finishes editing code, IronBee steps in and has it verify the changes before the task can complete, and every session shows up in the [Console](https://console.ironbee.ai).
Understand the completion gate, cycles, and verdicts behind what you just set up.
Install, remove, update, and track IronBee across your projects.
You can change both anytime later (see [Verification](/cli/guides/verification)).
That's it. Your project is now connected to IronBee.
Restart your AI coding client after installing so it picks up the new setup.
***
## What's next?
Give your agent a task as you normally would. When it finishes editing code, IronBee steps in and has it verify the changes before the task can complete, and every session shows up in the [Console](https://console.ironbee.ai).
Understand the completion gate, cycles, and verdicts behind what you just set up.
Install, remove, update, and track IronBee across your projects.